
Hello!! Can you believe Halloween is just over 2 weeks away? Where has October gone?
I'm sharing the last of my 3 projects made for Tim Holtz's Halloween Ideaology Facebook Live. This piece is a little spookier than my usual Halloween style but I think it was my favorite of the 3 projects I made.
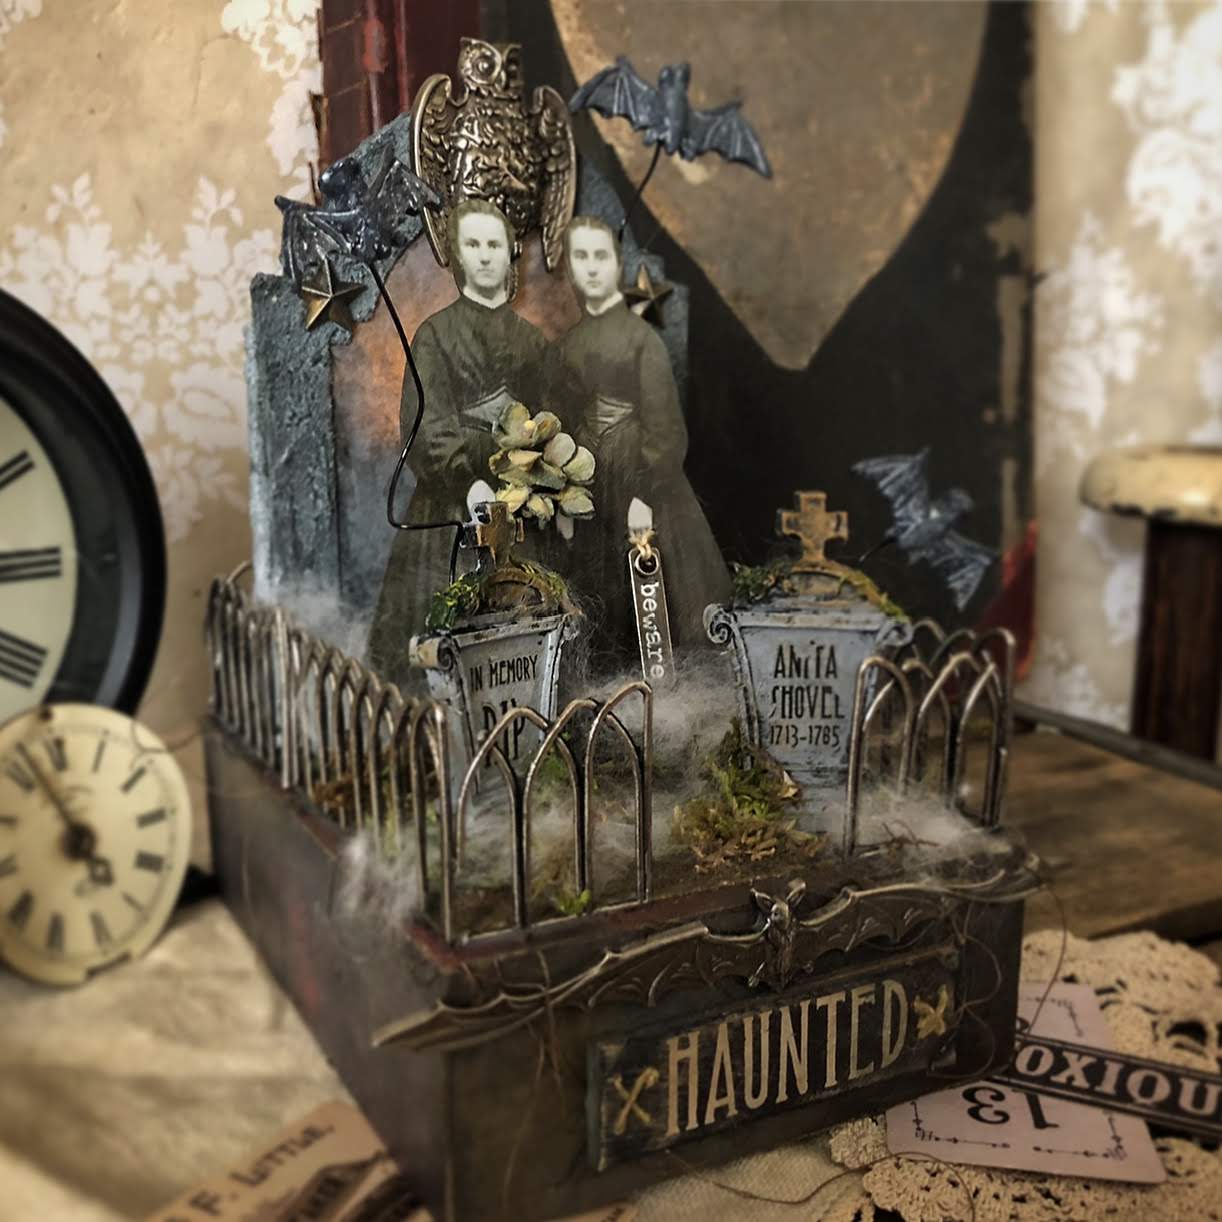
I wonder are the sisters visiting the graveyard or paying a visit to a guest who has wandered across their home?


The base is a Vignette Box covered in various patterns from the Abandoned Paper Stash. This small graveyard is protected on all edges by Metal Gates.

The Paper Doll sisters are standing in front of a backlit gravestone topped off with the owl from the Halloween Accents Adornments. The owl was altered with Mushroom Alcohol Ink and Walnut Stain Distress Crayon. Adornment Stars anchor the side of the gravestone, and were also altered with the above colors. Three Bitty Bats hover over the graveyard. To make the Bitty Bats fly adhere the bats to a piece of craft wire and cover the end of the wire with a piece of felt to finish the back. Attach the wire to the scene, with a puddle of hot glue then cover the hot glue with moss.

The sister on the left is holding a ghostly bouquet colored with Distress Spray. And the sister on the right holds a Story Stick that carries a warning for those who may cross their path.

The headstones from the Cryptic pack fit perfectly on the Vignette Box. The Halloween Remnant Rubs really take the headstones up a notch.

The front of the Vignette Box is adorned with the amazingly detailed bat from the Halloween Accents Adornment pack. The Quote Chip appears to be stitched onto the box. I peeled the top few layers of the Quote Chip from the chipboard piece and added stitching with Craft Thread distressed with Vintage Photo Distress Crayon. I then adhered the stitched piece back to the rest of the chipboard layer.

The light-up gravestone was a lot of fun to make and super easy. I began by cutting out 12 Stacked Archway pieces cut from mixed media paper. The window is created by centering the smaller of the Archway dies in the larger. I used washi tape to support the two pieces and keep them the same position for all cuts. Glue together 11 of the 12 layers and use clips to keep pieces from shifting while drying.

Cover one piece of the Archway with Grit Paste and set aside to dry.

I used a battery operated tea light for this piece so I created a little wall to go around the back of the piece to hide the candle. But now Tim has those really amazing Tiny Lights that would be absolutely perfect for this project. I attached the little wall to one side of the stacked archways. I covered the back of the piece with Grit Paste as well and let air dry.

While the Grit Paste was drying I created the screen of the gravestone using Plain Collage Paper. I began by spraying the Collage Paper with Pumice Stone Distress Oxide Spray and lightly sprayed with water and dried. I wanted it to be a little darker so I blended in some Black Soot Distress Oxide. Once I was happy with the color I die cut using only the largest size of Archway die. You don't want a window in this piece.

Once the Grit Paste pieces have dried I added color using the products shown in the next photo. To finish assembling the gravestone sandwich the Collage Paper piece between the stacked arch pieces and the single arch that will go on top of the Collage Paper piece.


Here it is all lit up in a darkened corner. I really enjoyed this project.
Although it hit me the other day that I should have added an epitaph to Plain Collage Paper.
What are you making this Halloween season?
Happy Creating ~ Jennalee
No comments:
Post a Comment