Showing posts with label paper dolls. Show all posts

Wednesday, October 16, 2019

A Graveyard Visit

Hello!! Can you believe Halloween is just over 2 weeks away? Where has October gone? 
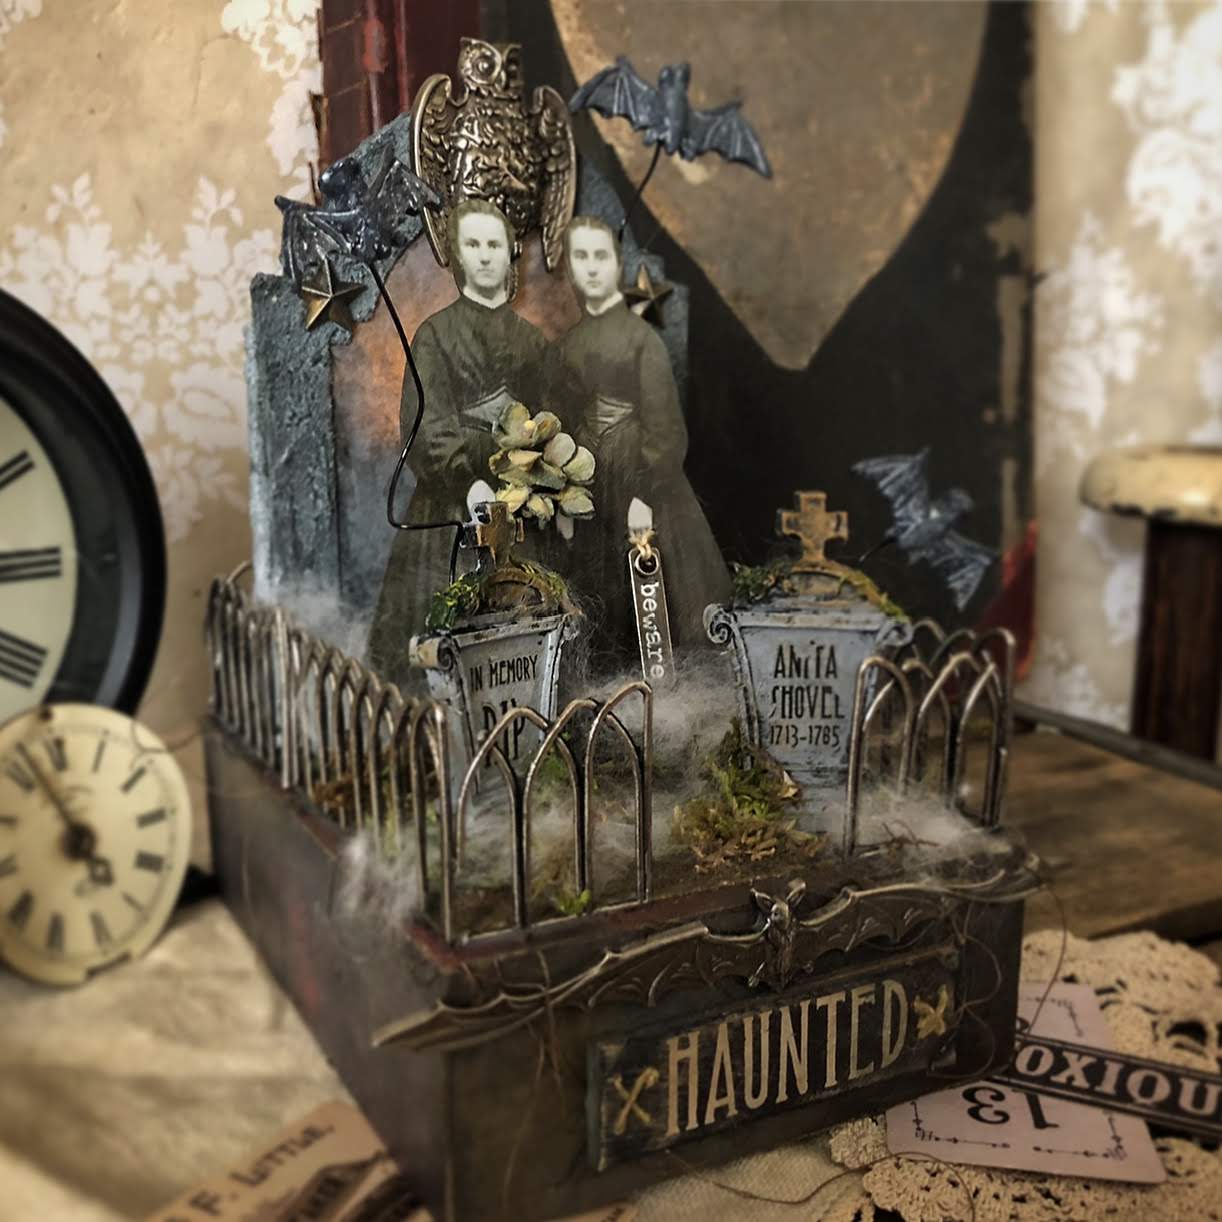
I'm sharing the last of my 3 projects made for Tim Holtz's Halloween Ideaology Facebook Live. This piece is a little spookier than my usual Halloween style but I think it was my favorite of the 3 projects I made. 
I wonder are the sisters visiting the graveyard or paying a visit to a guest who has wandered across their home? 


The base is a Vignette Box covered in various patterns from the Abandoned Paper Stash. This small graveyard is protected on all edges by Metal Gates. 


The Paper Doll sisters are standing in front of a backlit gravestone topped off with the owl from the Halloween Accents Adornments. The owl was altered with Mushroom Alcohol Ink and Walnut Stain Distress Crayon. Adornment Stars anchor the side of the gravestone, and were also altered with the above colors. Three Bitty Bats hover over the graveyard. To make the Bitty Bats fly adhere the bats to a piece of craft wire and cover the end of the wire with a piece of felt to finish the back. Attach the wire to the scene, with a puddle of hot glue then cover the hot glue with moss. 


The sister on the left is holding a ghostly bouquet colored with Distress Spray. And the sister on the right holds a Story Stick that carries a warning for those who may cross their path.


The headstones from the Cryptic pack fit perfectly on the Vignette Box. The Halloween Remnant Rubs really take the headstones up a notch. 


The front of the Vignette Box is adorned with the amazingly detailed bat from the Halloween Accents Adornment pack. The Quote Chip appears to be stitched onto the box. I peeled the top few layers of the Quote Chip from the chipboard piece and added stitching with Craft Thread distressed with Vintage Photo Distress Crayon. I then adhered the stitched piece back to the rest of the chipboard layer.


The light-up gravestone was a lot of fun to make and super easy. I began by cutting out 12 Stacked Archway pieces cut from mixed media paper. The window is created by centering the smaller of the Archway dies in the larger. I used washi tape to support the two pieces and keep them the same position for all cuts. Glue together 11 of the 12 layers and use clips to keep pieces from shifting while drying. 


Cover one piece of the Archway with Grit Paste and set aside to dry. 


I used a battery operated tea light for this piece so I created a little wall to go around the back of the piece to hide the candle. But now Tim has those really amazing Tiny Lights that would be absolutely perfect for this project. I attached the little wall to one side of the stacked archways. I covered the back of the piece with Grit Paste as well and let air dry. 


While the Grit Paste was drying I created the screen of the gravestone using Plain Collage Paper. I began by spraying the Collage Paper with Pumice Stone Distress Oxide Spray and lightly sprayed with water and dried. I wanted it to be a little darker so I blended in some Black Soot Distress Oxide. Once I was happy with the color I die cut using only the largest size of Archway die. You don't want a window in this piece. 


Once the Grit Paste pieces have dried I added color using the products shown in the next photo. To finish assembling the gravestone sandwich the Collage Paper piece between the stacked arch pieces and the single arch that will go on top of the Collage Paper piece. 


Here it is all lit up in a darkened corner. I really enjoyed this project. 
Although it hit me the other day that I should have added an epitaph to Plain Collage Paper. 

What are you making this Halloween season? 

Happy Creating ~ Jennalee 

Monday, June 11, 2018

Blessed are the Curious

Hi everyone!! I hope you had a great weekend. I had a few days off and snuck in some creative time along with a bit of junking. I incorporated a few of my new finds in this piece. 


Begin by embossing a piece of gold paper from the Paper Stash Metallic Kraft pad using the Mechanics 3D Texture Plate. The secret to getting a good impression with the Texture Plates is to mist your paper before running thru your machine. After you have embossing lightly sand paper and ink with Frayed Burlap Distress Ink. 


Cut and emboss Layered Butterfly from a 6x6 square of the cigar print found in the Dapper Paper Stash. Ink the embossed areas with Black Soot Distress Ink and apply random areas of gold metallique wax. 


Enhance metal embellishments. Apply a thin layer of Tarnished Brass Distress Paint to the largest size of arrow found in the Arrows Adornments. Using a Picket Fence Distress Crayon rub the crayon over the words on a Quote Token to make the sentiment stand out. 


Cut a small label using the Labels Thinlets set. Stamp numbers found in the Stampers Anonymous Etcetera set. I cut mine from this vintage Ticker Tape I picked up while out junking this weekend. 


Adhere label with Distress Collage Medium. Using an awl poke holes for the stitches. Attach Arrow Adornment with Craft Thread and needle. 


Stitch the butterfly down to the embossed background using coordinating Eclectic Elements Cotton Thread. Be sure to only stitch down the middle of the butterfly so that the wings will be able to pop off the background. 


Layer Baseboard Frame on top of the embossed background and attach with Hex Fastners on all four corners. Adhere piece to mixed media paper for some added stability and back with a piece of linen fabric ripped to size for frayed edges. Apply sentiment from Clippings Stickers. 


Adhere the smallest Measurements piece to background and layer on the Paper Doll with foam dots. Wrap top of the Quote Token with Craft Thread and tie a bow. Attach to piece with foam dots. The base is a large bolt that was also picked up on my weekend junking excursion. 


This piece came about because I was having so much fun playing with the Layered Butterfly die set I recently picked up. So don't be surprised if you see wings on lots of future projects!! I hope you enjoyed this tutorial and get to sneak in lots of creative time this week. Thanks for stopping by and spending a few minutes with me today. Happy Creating ~ Jennalee 


Friday, April 6, 2018

Winged Believers - Folk Art Inspired Dolls

Hello!! I'm here today with a folk art inspired project. I've wanted to try my hand at painting some folk art inspired dolls for a while and the Decorative Tags X Large set provided the perfect substrate. I kept the tags on the simpler side to allow the dolls to shine. Let's jump right in.


To begin cover your tags with a thin layer of gesso using a palette knife to apply. Allow the first layer to air dry and continue building until your tag is covered and you have your desired amount of texture.


Using Distress Crayons and a wet wipe color background. Allow some areas of gesso to show thru. 


Trace around paper dolls with a Distress Marker to blend white edges. Cut dolls at waist and set aside the feet. 


Lay doll image on tag to determine where the skirt will be placed. Using a pencil sketch out a rough skirt shape and paint in shape with gesso. 


Set dolls aside and color in skirt with Distress Crayons. Messy stitch around the skirt. 

On two of the tags I used Tim Holtz's Rosette layering stencil and a wet wipe to remove some of the Distress Crayon thru the stencil. 


I kept the backgrounds simple to allow the texture to shine thru. To add some interest I layered a few pieces of coordinating tissue tape. 


I used various wings from Tim Holtz's Flutter Set colored with coordinating Distress Inks and added to each girl. To finish off tags adhere feet to bottom edge of the tag. I typed out inspiring messages and adhered to each tag. To top each one off I attached an inked hole reinforcer. 


I love the size of the Decorative Tags X Large. I also love that thickness allows for the addition of messy stitching yet holds up to multiple layers of wet media. 

Thanks for stopping by and spending a few minutes with me today. I hope these folk art girls inspire you to spread your wings and try something just a little different. Happy Creating ~ Jennalee