
Hello!! I'm so happy to share my Haunted Mirror project with you today. Did you see the amazing Halloween Ideaology release from Tim Holtz? You can catch the replay here. There are so many amazing designer projects featuring this inspiring new release. I am so grateful that I was included in the fun and hard work that comes with a new release.
I'll be the first to admit that I am a big wimp and very easily scared. Absolutely NO scary movies for this girl. So this project was a bit spooky for me!! More than once I caught a glimpse of the mirror out of the corner of my eye and jumped.

As I was looking at all the new products the combination of the Wallpaper and this Baseboard Frame made me think of a Victorian mirror. Then I came across this very spooky girl from the Paper Doll pack and knew she needed to haunt the mirror.

I began by turning a Vignette Tray into a creepy abandoned room. I spent some time looking at abandoned rooms on Pinterest they are beautifully haunting and sparked so many questions.
I started by laying down a few larger pieces of the wallpaper and adhered them with Collage Medium. I then filled in any blank spaces with smaller pieces ripped to size. I let the Collage Medium dry and then started ripping back corners here and there. Because the corners had been glued down and then rolled back they gave a more authentic effect of peeling wallpaper.

Then the fun part distressing!! I pulled out my Vintage Photo and Walnut Stain Distress Crayons. The Wallpaper has a wonderful texture that is perfect for using the Distress Crayons on. I just scribbled the crayon right onto the paper and then smudged it around using a baby wipe. I also used Vintage Photo Distress Ink with a blending tool.

I used a piece of Mirrored for the mirror. I originally thought of doing an image transfer on the front of the mirror but then thought it would be creepier if it appeared that the ghostly girl was in the mirror. So I started experimenting.
I found the best way to achieve this was to figure out the area you wanted your ghost to appear and remove the white backing from that area only. To remove the adhesive I applied a layer of alcohol hand sanitizer and let it sit for a few minutes. I then went in with a gift card and some elbow grease and scraped away the adhesive layer. You may need to do this step a 2nd time.
There will still be a slight bit of tackiness left this is where the Acetone polish remover comes in handy. It helps to remove any remaining adhesive and also removes the silver backing of the mirror.

You don't want to remove all of the silver otherwise the ghost won't blend in.

Here you can see the bottom left corner is where I have removed the silver backing. To distress the front I lightly pounced some spots with the polish remover and then applied Mushroom Alcohol Ink. To the back of the mirror I add a bit Tarnished Brass Distress Paint as a halo around the area where the silver was removed.

I adhered the ghostly Paper Doll to a piece of Metallic Kraft. I then added a bit of color around her with Mushroom Alcohol Ink.

I then used the remaining adhesive back on the mirror to adhere the Metallic Kraft to the mirror.

I sanded the frame and added Distress Crazing Medium randomly around the frame. Once the Crazing Medium air-dried I went in with Vintage Photo Distress Crayon and Distress Ink to further distress.
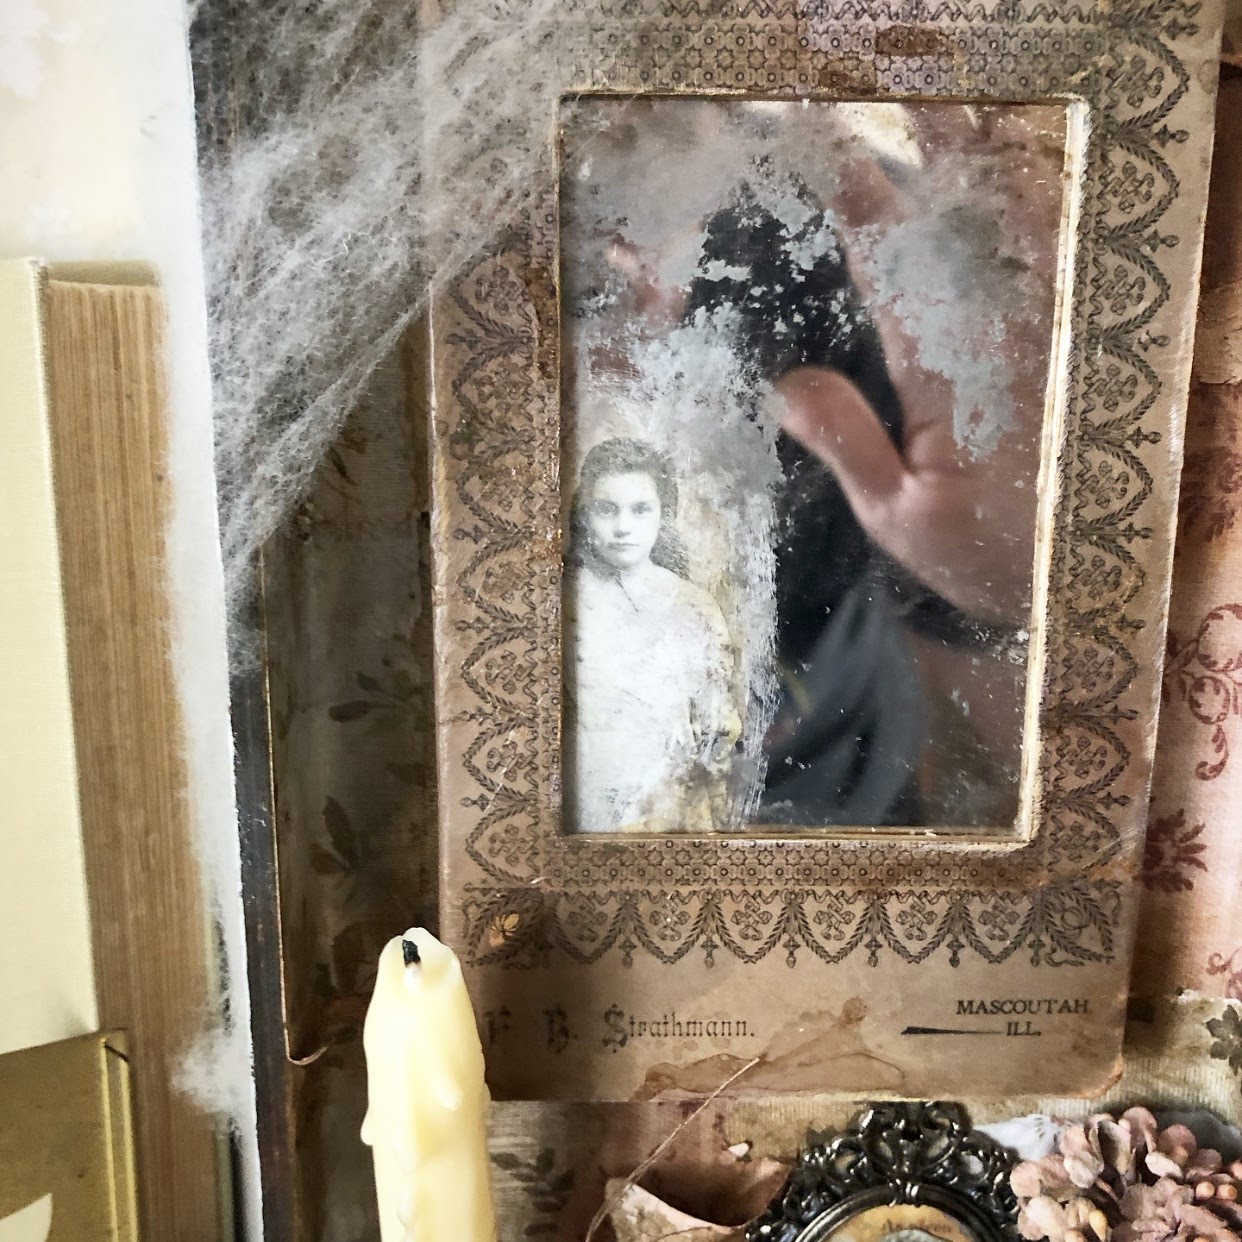
Here is the mirror all finished up. Can you see me waving?

I added a small wire hanger at the top of the mirror and added a nail from the Vignette Hardware Pack in the Vignette Tray. I like how this allows the mirror to swing and adds to the ghostly effect.

For the candlestick I painted and distressed a Finial Base.

Then came the fun part!! Fire!! I used a cheap taper candle from the dollar store so it melted very easily with my heat gun. I started by cutting it down to size and then using my heat gun added the drips to the candle and finial base. To adhere the candle to the base I blasted it with my heat gun and then set it on the base and let it cool in place. To give it a more authentic look I lit the candle for just a minute.

For the book cover I used a piece from the Snippets pack.

I colored a piece of canvas using Fired Brick Distress Oxide Spray.

For the book pages I cut regular copy paper to size and coffee dyed. Once the pages were dry I split them into 3 signatures and stitched each signature onto the canvas piece.


I then had some fun writing a story using the Halloween Clipping Stickers.

The new Mummy Cloth is such a yummy texture and takes ink so easily.

I added a piece of Etcetera Trim to the bottom edge of the Vignette Box to create a larger area for my mantle decor.

To decorate the mantle I added the Mummy Cloth as a runner and then adhered the candlestick, a couple of Pumpkins that were distressed to look dusty, a vintage glass bottle adorned with a Rub-On and an arrangement of Bouquet Flowers. Hanging behind the bottle is a family portrait created with a Baroque Frame layered over a scrap of Abandoned patterned paper. I left the little book loose so that the story could be read.

To finish off the piece I added a Curio Knob to the top of the Vignette Tray and draped it with some faux spider web.

I really had fun with this project. The idea of abandoned rooms really had me wondering what happened? So many questions left unanswered.
Be sure to stop by Tim's blog and catch the replay and see all of the other designer's amazing work. A huge thank you to Tim, Mario, and Paula for all they do and for including me in the fun.
Leave me a note and let me know you stopped by today.
Happy Creating ~ Jennalee
Happy Creating ~ Jennalee