Wednesday, October 23, 2019

Unseen Magic


Hello!! I'm back with one more Halloween project. I am itching to jump into Christmas creating but wanted to sneak in one more spooky project. I've had a paper mache witch's hat sitting on my table waiting for inspiration to strike. When I found some witch boots that I had cut from Tim Holtz's Ice Skate die and knew just where this hat was going to go. 


I began by painting the paper mache hat with black acrylic paint and let dry. I wanted a worn and vintage look so started playing with different inks and mediums until I achieved the look I wanted. I randomly sprayed Black Soot Distress Oxide Spray around the hat and lightly spritzed with water. Once dry I blended in Walnut Stain Distress Crayon and smudged with a damp finger. With a soft brush, I blended in umber artisan powder. 
Around the bottom of the hat, I added a band of 3D Mini Scallop Impresslits cut from aluminum tape and painted black. 


I then painted and distressed one of the larger bases from the Vignette Finial Set the same as the hat. I had previously planned to use this base in another project and had glued a wooden piece to it. I used Distress Collage Medium and let me tell you that stuff sticks!! There was no getting the two pieces apart once dry!! 


Here is the finished base with the Quote Token attached using distressed Craft Thread. 


I then altered one of the larger sized Corked Vials. I began by pouncing on Mushroom and Smolder Alcohol Inks. Once those were dry I used my finger to randomly apply Distress Collage Medium and blended in some artisan powder to give it a dusty look. 


I finished it off with a bit of the leftover Craft Thread and added a poison label from the Halloween Ephemera set. 


I then altered a couple of Mini Pumpkins with Mushroom and Smolder Alcohol Inks. 


The witch of the hour is from last year's Framed Portraits Halloween. I took her out of the black frame and layered her under one of this year's Baseboards and Layers frames and topped it off with a Baroque frame. 


Now for my favorite part!! 


To make your boot begin by cutting out one or more of the Ice Skates. 


Cut along the white lines, adding a notch in the heel for extra detail. 


Cover boots with a layer of Distress Crazing Medium and allow to air dry. Once dry distress boots using Walnut Stain Distress Crayon and umber artisan powder. 
Cut a length of Craft Thread and distress using the Walnut Stain Distress Crayon. 
To thread the boots I like to start at the back pull needle thru until even lengths are on front and back. Then thread thru every other hole and leave the remaining tail at the top of the boot. Move the needle to the other end of the thread and thread the remaining holes. Tie a bow in the remaining tails at the top of the boot. 


I also added a bit of brown lace to the top of this boot. 


To help the text pop on the Quote Tokens add some Picket Fence Distress Crayon to the debossed areas, wipe away the excess crayon using a paper towel. 
the handle of the Broomstick has a length of distressed Craft Thread wrapped around it. 


To finish off your witch's hat adhere all pieces to the brim. I added a bit of dried moss to mine as filler. Or who knows maybe it's a secret witchy ingredient? Oh and I topped the hat off with a Bitty Bat. 

I had a lot of fun making this witchy headwear.

I am linking up to Simon Says Stamp Monday Challenge

What Halloween and Fall projects are you working on? Or have you jumped headfirst into Christmas?

Happy Creating ~ Jennalee 


Wednesday, October 16, 2019

A Graveyard Visit

Hello!! Can you believe Halloween is just over 2 weeks away? Where has October gone? 
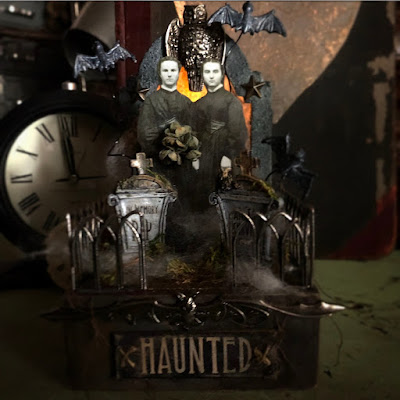
I'm sharing the last of my 3 projects made for Tim Holtz's Halloween Ideaology Facebook Live. This piece is a little spookier than my usual Halloween style but I think it was my favorite of the 3 projects I made. 
I wonder are the sisters visiting the graveyard or paying a visit to a guest who has wandered across their home? 


The base is a Vignette Box covered in various patterns from the Abandoned Paper Stash. This small graveyard is protected on all edges by Metal Gates. 


The Paper Doll sisters are standing in front of a backlit gravestone topped off with the owl from the Halloween Accents Adornments. The owl was altered with Mushroom Alcohol Ink and Walnut Stain Distress Crayon. Adornment Stars anchor the side of the gravestone, and were also altered with the above colors. Three Bitty Bats hover over the graveyard. To make the Bitty Bats fly adhere the bats to a piece of craft wire and cover the end of the wire with a piece of felt to finish the back. Attach the wire to the scene, with a puddle of hot glue then cover the hot glue with moss. 


The sister on the left is holding a ghostly bouquet colored with Distress Spray. And the sister on the right holds a Story Stick that carries a warning for those who may cross their path.


The headstones from the Cryptic pack fit perfectly on the Vignette Box. The Halloween Remnant Rubs really take the headstones up a notch. 


The front of the Vignette Box is adorned with the amazingly detailed bat from the Halloween Accents Adornment pack. The Quote Chip appears to be stitched onto the box. I peeled the top few layers of the Quote Chip from the chipboard piece and added stitching with Craft Thread distressed with Vintage Photo Distress Crayon. I then adhered the stitched piece back to the rest of the chipboard layer.


The light-up gravestone was a lot of fun to make and super easy. I began by cutting out 12 Stacked Archway pieces cut from mixed media paper. The window is created by centering the smaller of the Archway dies in the larger. I used washi tape to support the two pieces and keep them the same position for all cuts. Glue together 11 of the 12 layers and use clips to keep pieces from shifting while drying. 


Cover one piece of the Archway with Grit Paste and set aside to dry. 


I used a battery operated tea light for this piece so I created a little wall to go around the back of the piece to hide the candle. But now Tim has those really amazing Tiny Lights that would be absolutely perfect for this project. I attached the little wall to one side of the stacked archways. I covered the back of the piece with Grit Paste as well and let air dry. 


While the Grit Paste was drying I created the screen of the gravestone using Plain Collage Paper. I began by spraying the Collage Paper with Pumice Stone Distress Oxide Spray and lightly sprayed with water and dried. I wanted it to be a little darker so I blended in some Black Soot Distress Oxide. Once I was happy with the color I die cut using only the largest size of Archway die. You don't want a window in this piece. 


Once the Grit Paste pieces have dried I added color using the products shown in the next photo. To finish assembling the gravestone sandwich the Collage Paper piece between the stacked arch pieces and the single arch that will go on top of the Collage Paper piece. 


Here it is all lit up in a darkened corner. I really enjoyed this project. 
Although it hit me the other day that I should have added an epitaph to Plain Collage Paper. 

What are you making this Halloween season? 

Happy Creating ~ Jennalee 

Sunday, September 15, 2019

Dr. Col Lector - Doctor of Optometry


Hello!! I'd like to introduce Dr. Col Lector aka Collector. This is the 2nd of 3 projects made for Tim Holtz's amazing Halloween Idea-Ology release. The eyeballs were the inspiration for this project. As I sat with them I thought of a traveling salesman's kit. Then as I was reading all of the type tokens my backstory took a spooky turn when I came across the "Found Objects" token.
Dr. Col Lector is an optometrist but just how reputable is he? His case of found objects leaves many questioning where he finds his inventory. 


The base of this piece is a Vignette Box covered with paper from the Abandoned Paper Stash. The top of the box features the Cigar Box from the Layers and Baseboards Frames. The Poison label came from the same package. The Poison label was messy stitched onto the piece of Abandoned paper before adhering to the box. 


Any good salesman's case needs a handle for easy traveling. I adhered a Mini Hardware Pull to the side of the Trinket Tin using Distress Collage Medium and layered the Pull with Hardware Heads. Before adhering the Pull I wrapped it with Craft Thread distressed with Walnut Stain Distress Crayon. Once the handle was dry I added the Found Objects Quote Token on a Loop Pin. 


To finish off the open corner of the box I added an Apothecary Vial, Alpha Dice, and vintage lens. 


This artificial eye chart also from the Layers and Baseboards Frame set was perfect for our devious doctor. The eye chart is layered behind a Baseboard Frame that has been sanded and distressed. I added Hardware Heads to the corners. The bottom of the frame is adorned with a Toxique label and that creepy White the Druggist eye was perfect for the top. 

This particular Paper Doll had just the right amount of creep. He holds his favorite tool a spoon from the Silverware Adornments. 


The doctor's fine inventory on display. As you can see he has had some business and will need to restock soon. 


The calling card is fashioned from a piece of wide vintage velvet ribbon. The doctor's info was created using a label and words from the Curiosities Sticker Book. I have to say the Sticker Book was one of my favorite things from this release. 

I added a border of messy stitching not shown here before adhering the calling card inside the case. 


Here is a peek at how I made the dividers for the case. I began by cutting chipboard to length to fit the tin. I cut two longer pieces to run horizontally and three smaller pieces to run vertically. After measuring where they would intersect I cut small notches in the chipboard. I then covered all the pieces with the same vintage ribbon used to make the calling card. After the glue had dried I went back and snipped the ribbon where the slits had been cut in the chipboard. I then assembled the dividers and inserted into the case. 


I love how just a little bit of Alcohol Ink can up the spooky factor of these eyes. I used a very fine paintbrush and Watermelon and Latte Alcohol Ink to add veins to the eyes. 


The backside of the piece follows thru with an eye chart and Apothecary Vial. The lid to the Trinket Tin was distressed with Mushroom Alcohol Ink and then layered with a label from the Halloween Ephemera pack and a Quote Chip. 


I hope you enjoyed this walk-thru of the project and peek into the background story I had in mind while creating this piece. 

All I know is I sure wouldn't want to find myself in a dark alley with Dr. Col Lector.

Happy Creating ~ Jennalee 

Thursday, August 8, 2019

The Haunted Mirror

Hello!! I'm so happy to share my Haunted Mirror project with you today. Did you see the amazing Halloween Ideaology release from Tim Holtz? You can catch the replay here. There are so many amazing designer projects featuring this inspiring new release. I am so grateful that I was included in the fun and hard work that comes with a new release. 

I'll be the first to admit that I am a big wimp and very easily scared. Absolutely NO scary movies for this girl. So this project was a bit spooky for me!! More than once I caught a glimpse of the mirror out of the corner of my eye and jumped. 


As I was looking at all the new products the combination of the Wallpaper and this Baseboard Frame made me think of a Victorian mirror. Then I came across this very spooky girl from the Paper Doll pack and knew she needed to haunt the mirror. 


I began by turning a Vignette Tray into a creepy abandoned room. I spent some time looking at abandoned rooms on Pinterest they are beautifully haunting and sparked so many questions.

I started by laying down a few larger pieces of the wallpaper and adhered them with Collage Medium. I then filled in any blank spaces with smaller pieces ripped to size. I let the Collage Medium dry and then started ripping back corners here and there. Because the corners had been glued down and then rolled back they gave a more authentic effect of peeling wallpaper. 


Then the fun part distressing!! I pulled out my Vintage Photo and Walnut Stain Distress Crayons. The Wallpaper has a wonderful texture that is perfect for using the Distress Crayons on. I just scribbled the crayon right onto the paper and then smudged it around using a baby wipe. I also used Vintage Photo Distress Ink with a blending tool. 


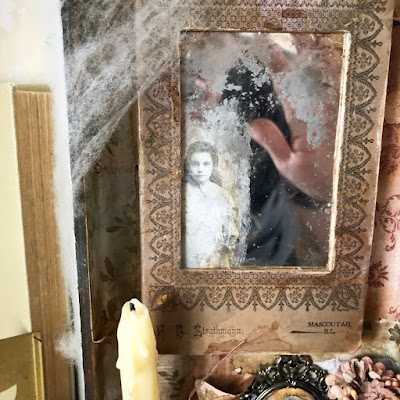
I used a piece of Mirrored for the mirror. I originally thought of doing an image transfer on the front of the mirror but then thought it would be creepier if it appeared that the ghostly girl was in the mirror. So I started experimenting. 

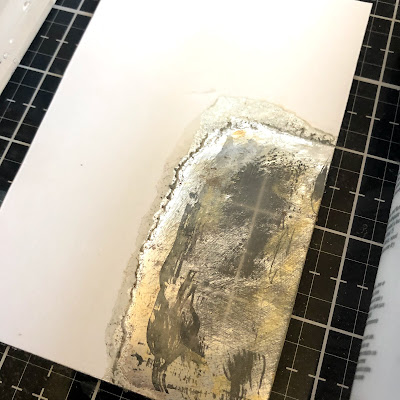
I found the best way to achieve this was to figure out the area you wanted your ghost to appear and remove the white backing from that area only. To remove the adhesive I applied a layer of alcohol hand sanitizer and let it sit for a few minutes. I then went in with a gift card and some elbow grease and scraped away the adhesive layer. You may need to do this step a 2nd time. 

There will still be a slight bit of tackiness left this is where the Acetone polish remover comes in handy. It helps to remove any remaining adhesive and also removes the silver backing of the mirror. 


You don't want to remove all of the silver otherwise the ghost won't blend in. 


Here you can see the bottom left corner is where I have removed the silver backing. To distress the front I lightly pounced some spots with the polish remover and then applied Mushroom Alcohol Ink. To the back of the mirror I add a bit Tarnished Brass Distress Paint as a halo around the area where the silver was removed. 


I adhered the ghostly Paper Doll to a piece of Metallic Kraft. I then added a bit of color around her with Mushroom Alcohol Ink. 


I then used the remaining adhesive back on the mirror to adhere the Metallic Kraft to the mirror. 


I sanded the frame and added Distress Crazing Medium randomly around the frame. Once the Crazing Medium air-dried I went in with Vintage Photo Distress Crayon and Distress Ink to further distress. 


Here is the mirror all finished up. Can you see me waving? 


I added a small wire hanger at the top of the mirror and added a nail from the Vignette Hardware Pack in the Vignette Tray. I like how this allows the mirror to swing and adds to the ghostly effect. 


For the candlestick I painted and distressed a Finial Base. 


Then came the fun part!! Fire!! I used a cheap taper candle from the dollar store so it melted very easily with my heat gun. I started by cutting it down to size and then using my heat gun added the drips to the candle and finial base. To adhere the candle to the base I blasted it with my heat gun and then set it on the base and let it cool in place. To give it a more authentic look I lit the candle for just a minute. 


For the book cover I used a piece from the Snippets pack. 


I colored a piece of canvas using Fired Brick Distress Oxide Spray. 


For the book pages I cut regular copy paper to size and coffee dyed. Once the pages were dry I split them into 3 signatures and stitched each signature onto the canvas piece. 


I then had some fun writing a story using the Halloween Clipping Stickers. 


The new Mummy Cloth is such a yummy texture and takes ink so easily.


I added a piece of Etcetera Trim to the bottom edge of the Vignette Box to create a larger area for my mantle decor.  


To decorate the mantle I added the Mummy Cloth as a runner and then adhered the candlestick, a couple of Pumpkins that were distressed to look dusty, a vintage glass bottle adorned with a Rub-On and an arrangement of Bouquet Flowers. Hanging behind the bottle is a family portrait created with a Baroque Frame layered over a scrap of Abandoned patterned paper. I left the little book loose so that the story could be read. 


To finish off the piece I added a Curio Knob to the top of the Vignette Tray and draped it with some faux spider web. 


I really had fun with this project. The idea of abandoned rooms really had me wondering what happened? So many questions left unanswered. 

Be sure to stop by Tim's blog and catch the replay and see all of the other designer's amazing work. A huge thank you to Tim, Mario, and Paula for all they do and for including me in the fun. 

Leave me a note and let me know you stopped by today.
Happy Creating ~ Jennalee