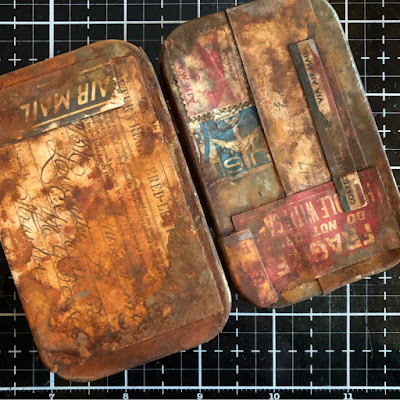
The Altoid Tin comes ready for altering. I started by sanding mine to give it some tooth.
Add some color to your tin with Mushroom and Gun Metal Alcohol Inks.
Cover the tin with ephemera. I used a mix of Tim Holtz ephemera and vintage postage.
Apply Rusting Powder with chosen adhesive and spray with a mix of vinegar and water. Spray every 15 minutes until level of desired rust is achieved.
Look at that rusty goodness!!
Cut a background for the inside of your Altoid Tin lid from Tim Holtz Journaling Cards. Smoosh into a puddle of Vintage Photo Distress Oxide. And add a length of Ruler Ribbon attached using a Tiny Attacher.
Select a variety of postal themed ephemera to slip into the ribbon of the lid background.
Cover the Altoid Tin Frame with patterned paper and add distressing with the run off of Rusting Powder from the tin. Add a Classic Label Sticker and hand-stitch an Arrow Adornment to the bottom of the frame.
Using foam dots build up the frame insert to desired height. I chose to make mine level with the top of the tin. Cut a piece of patterned paper to apply to the inside of frame to cover the foam dots.
Heat emboss a Photobooth photo using Vintage Beeswax. Once cool messy stitch photo onto a scrap of shorthand text.
Stack foam squares to desired height and adhere to inside of tin. Color a small bunch of flowers with Aged Mahogany Distress Ink and slip inside the frame.
I really enjoyed putting together this little tin and think there will be more in the future. And I can definitely see more faux rust using this method!!
Happy creating ~ Jennalee


This looks fantastic. I like how you created the vintage rusty look on this.
ReplyDeleteThank you Anne!! It was a fun process. That rusting powder is so easy to work with and I can’t wait to find something else to use it on!!
DeleteHow sweet and fun!
ReplyDeleteThanks so much!!
DeleteEvery detail fantastic! Love the tin alteration!
ReplyDeleteThank you Anita!! Any time I get to play with faux rust I’m happy!!
DeleteGreat job on the tin alteration! Lots of great layers in this awesome project! Well done girlie!
ReplyDelete