Friday, January 18, 2019

Two of Hearts

Hello!! Happy Friday everyone. I'm here today with a quick little Valentine project inspired by these amazing Heart Playing Cards from Gypsy Soul Laser Cuts. The instant I saw them I envisioned them all rusty as a frame for some antique photos. Although this was a super easy project I am so pleased with the outcome.


The frames come in a 2 pack and there are 4 pieces total with the fronts and backs. 


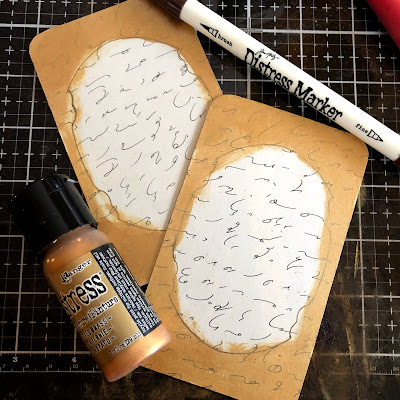
Run the frame backs thru your Xyron and apply short hand book text. Trace around the frame opening and then paint the outer edges of the back gold. This gold accent will pop thru once the frame is put together. 


For the top of the frame pieces I used my favorite faux rust treatment. 
 Using a cosmetics sponge apply brown paint and then dip directly into cinnamon. Pounce on more brown paint and heat set. If you have a heat gun that runs hot you can burn the cinnamon for that great crusty effect. But be careful!! 


Photo copy your vintage images. Heat emboss using Baked Texture Vintage Beeswax. Die cut with Stitched Oval die. I heat embossed my images before die cutting so that the die cut details would stand out. 


Cut a length of vintage patterned seam binding and adhere down the center of the frame backs. Adhere the photos centered in the cutout area. 


Adhere frame to the back. And voila you have a super easy antique inspired Valentine in just a few minutes. 


Although its a quick and simple project I love the way these Heart Playing Card frames take the main stage. And be sure to stay tuned on the Gypsy Soul Laser Cuts Blog this coming Monday Jess from Two Mad Dahlias has a tutorial using these amazing frames as well!!
Happy Creating ~ Jennalee 

Friday, January 4, 2019

With Wonder Shadowbox

Hello!! Happy Friday and Happy New Year!! I spent the first day of 2019 in my studio playing, and this was the result!! I had put together this Mini Shadowbox a while back and found it in my drawer while looking for the Pocket Watch, which was the inspiration for this whole piece. Being the new year I wanted to make something with a watch or clock theme. From there I just let the piece guide me. Those are always my favorite projects!!  


Begin by covering the inside surfaces of the 3-inch Shadowbox with vintage ledger scraps and cigar label patterned paper from Tim Holtz Paper Stash. Then assemble the box.


Cover the back of the shadowbox with a ruler print patterned paper. Cover the sides of the shadowbox with a faux rust background.  Sand edges and ink to help everything blend together. 


Apply Distress Crazing Medium to back of box and allow to air dry. Once dry add distressing using Prima Artist Powders.


Make a photocopy of a vintage photo booth photo on plain copy paper. Heat emboss two layers of Vintage Beeswax over image. I prefer to do this technique on plain copy paper because of the unique transparent effect it achieves. 


Apply Distress Grit Paste randomly on the 1 1/2 inch Pocket Watch. Allow to air dry. 


Once the Grit Paste has air dried apply a faux rust treatment. 


Stitch photo to pocket watch. Wrap wire around the top of pocket watch. 


Heat emboss the 2-inch clock from the Pocket Watch Assorted Size Set with Burnt Copper Leaves and a sprinkle of Patina Oxide.  


Adhere clock to inside of shadowbox. Add a small screw in hook to top inside of box. 


Add a Gadget Gear to the inside of the clock. In bottom left corner add altered Numeral. I wanted a nod to 2019 so I cut the word nineteen out of the dictionary and adhered it to the metal number. 


Finish off two opposite corners with a corner sticker from Industrious Sticker Gallery. 


Apply Handle with Care ephemera piece to top of shadowbox. 


To finish off the pocket watch add 'wonder' sentiment from Clippings Stickers. Adhere key to bottom of shadowbox. Add a vintage metal film canister lid to bottom of box for a stand. 


I really enjoyed creating this project and love the way it turned out. It was a great way to kick off 2019. I wish you all a very happy year full of renewed creativity!! 
Thanks for stopping by and happy creating my friends ~ Jennalee