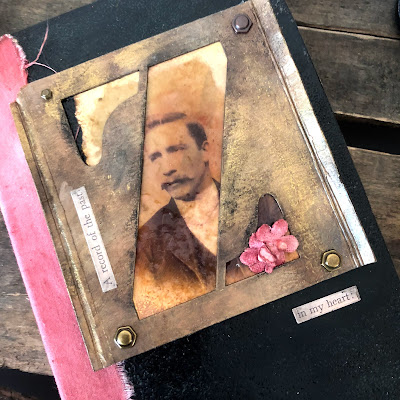
When I started trying to find a home for my stencil I fiddled around with it on a vintage ledger but the ledger was larger than I wanted. Then it hit me I could make my own!!
Begin by painting stencil. I used Tarnished Brass and Antique Bronzed Distress Paints, Black Soot Distress Crayon and Metallique Wax to get an aged look on my stencil. Bend edges to give it the look of an interlocking brass stencil.
Blend Black Soot Distress Ink onto the front and back of an Eileen Hull Journal cover using a blending tool.
Rub Black Soot Distress Ink pad across the journal cover. Use a light touch to get a mottled look of a vintage journal cover. Work in halves for this step to give plenty of time to apply embossing powder while ink is still wet.
Once heat embossed and piece has cooled rub Vintage Photo Distress Crayon into the pits of the embossed surface. Use a baby wipe and paper towel to blend as desired.
Not shown - Rip a piece of muslin to size of journal spine and color with Aged Mahogany Distress Ink. Create a stencil for the journal binding using the letters from Tim Holtz's Gift Card Die. Align letters and apply to washi tape. Cut from a piece of Freezer Paper.
Iron freezer paper to piece of muslin and apply embossing ink thru stencil. Remove stencil and apply gold embossing powder and melt.
Assemble journal and decorate cover using the Alphabet Stencil. I made a copy of a cabinet card in my collection. I added a thin uneven layer of Vintage Beeswax embossing powder to my photo and layered the stencil over it. I added a couple of flowers from Tim Holtz's Bouquet, added a Hex Fastner to each corner and finished it off with a couple sentiment stickers from Clipping stickers.
Using the same technique for the stencil for the spine make a stencil for the number in the bottom corner. To add to the vintage feel I bent the cover to give it a worn look.
Cover inside of journal with vintage ledger paper and ink edges with Vintage Photo Distress Ink.
The stencils will be coming to Gypsy Soul Laser Cuts soon so be sure to keep an eye out for them.
Thanks for spending a few minutes with me today. I hope you get to sneak in some creative time this weekend!! Happy Creating ~ Jennalee


This is awesome! Thanks so much for sharing :-)
ReplyDeleteThanks bunches Freddie!! And thanks for stopping by :)
DeleteAwesome! I love the finished look of the journal. It really gives it a new depth and whole new look.
ReplyDeleteThanks!! It was fun experimenting!!
Deletethis is awesome. What a great idea and replica! LOVE the big stencil on the cover!!
ReplyDeleteThanks Paula!! It was one of those projects that just kind of happened. And isn't the stencil great? I love using them as frames and best part is I still have 25 more!!
DeleteAbsolutely gorgeous, fabulous idea and so authentic. Love this. Tracy ❤️❤️
ReplyDeleteThanks so much Tracy!! I really appreciate that!!
DeleteFabulous! Do you have suggestions/tips for gluing muslin onto the book spine?
ReplyDeleteThank you Sue!! I used Distress Collage Medium to adhere the muslin. It's my go to adhesive for big jobs like this.
Deletethanks!
DeleteLove how vintage it looks! Beautiful creation as always Jennalee!! 😍
ReplyDeleteThank you so much Cathy!! I appreciate your kind words!!
DeleteJust amazing Jennalee. Beautiful project and great tutorial ❤️❤️❤️
ReplyDeleteVery cool Jennalee!
ReplyDeleteJackie xo